> ## Documentation Index
> Fetch the complete documentation index at: https://docs.tavus.io/llms.txt
> Use this file to discover all available pages before exploring further.
# What is CVI?
> CVI enables real-time, human-like video interactions through configurable lifelike replicas.
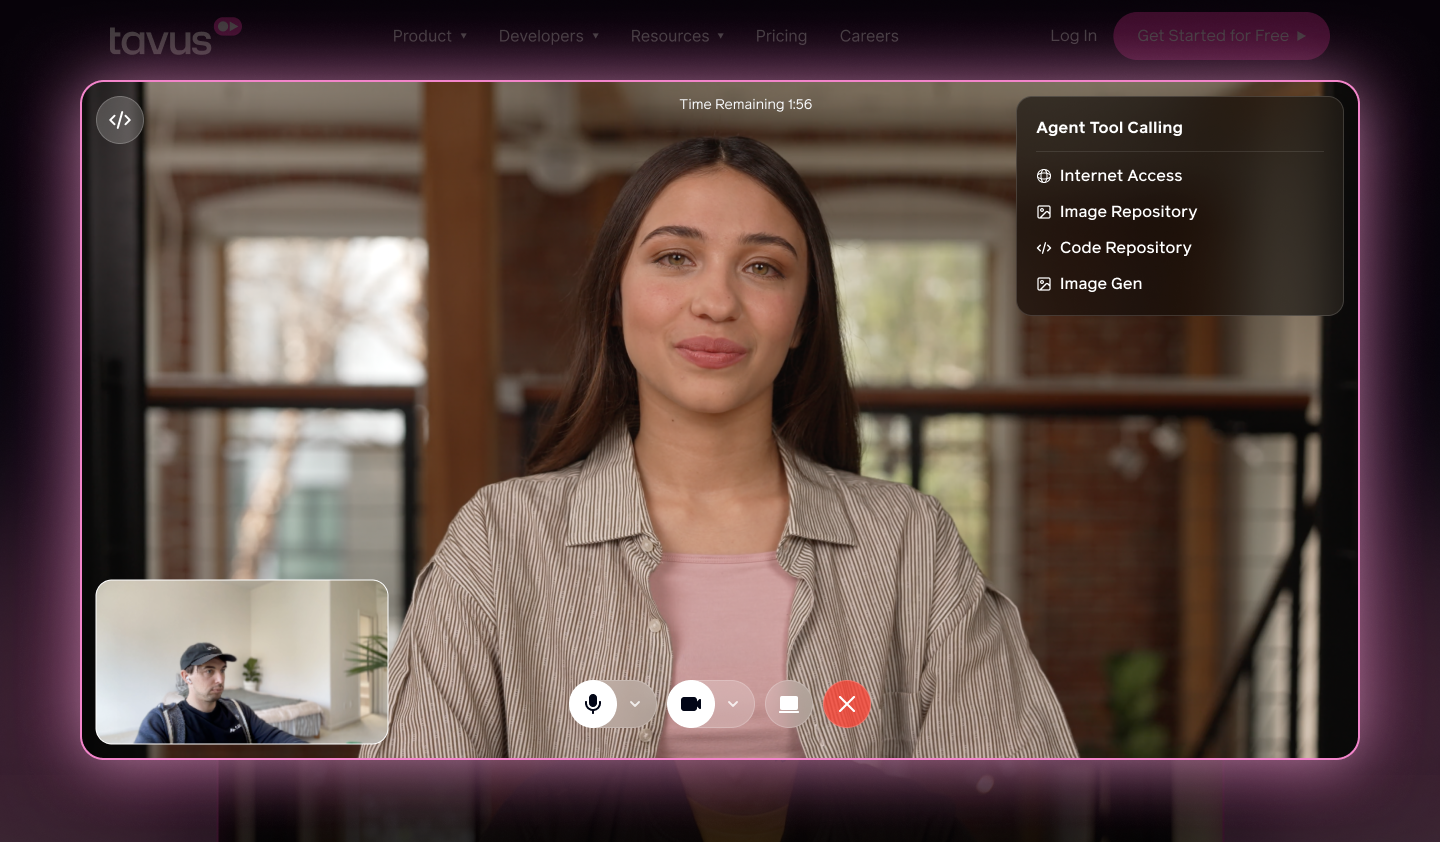 Conversational Video Interface (CVI) is a framework for creating real-time multimodal video interactions with AI. It enables an AI agent to see, hear, and respond naturally, mirroring human conversation.
CVI is the world’s fastest interface of its kind. It allows you to map a human face and conversational ability onto your AI agent. With CVI, you can achieve low-latency utterance-to-utterance response: the full round-trip time from when a participant speaks to when the replica replies.
CVI provides a comprehensive solution, with the option to plug in your existing components as required.
## At a glance
Building with an AI coding agent or automation? Use
`https://docs.tavus.io/llms.txt` for the canonical page index,
`https://docs.tavus.io/llms-full.txt` for the full bundled docs export, and
`https://docs.tavus.io/openapi.yaml` for the HTTP API contract.
* **CVI** — Real-time multimodal video: the agent sees, hears, and responds; media runs over **WebRTC** (powered by Daily).
* **Latency** — Utterance-to-utterance round-trip is optimized for real-time use (participant speaks → replica replies).
* **Three pillars** — **[Persona](/sections/conversational-video-interface/persona/overview)** (behavior, knowledge, and CVI layer pipeline); **[Replica](/sections/replica/overview)** (visual digital human, **Phoenix**); **[Conversation](/sections/conversational-video-interface/conversation/overview)** (live session linking persona and replica).
* **Pipeline (in order)** — Perception (**Raven**) → Conversational Flow (**Sparrow**) → Speech recognition (STT) → Large language model (LLM) → Text-to-speech (TTS) → Realtime replica (**Phoenix**). **Raven** is visual perception; **Sparrow** handles turn-taking and interruptibility; **Phoenix** is the real-time visual replica engine.
* **Where to configure** — Most layers are set on the **[Persona](/sections/conversational-video-interface/persona/overview)**.
## Key Concepts
CVI is built around three core concepts that work together to create real-time, humanlike interactions with an AI agent:
The **Persona** defines the agent’s behavior, tone, and knowledge. It also configures the CVI layer and pipeline.
The **Replica** brings the persona to life visually. It renders a photorealistic human-like avatar using **Phoenix**.
A **Conversation** is a real-time video session that connects the persona and replica through a WebRTC connection.
## Key Features
CVI uses facial cues, body language, and real-time turn-taking to enable natural, human-like conversations.
Customize the Perception, STT, LLM and TTS layers to control identity, behavior, and responses.
Choose from over 100+ hyper-realistic stock replicas or customize your own with human-like voice and expression.
Hold natural conversations in 42+ languages using the supported TTS engines.
Experience real-time interactions with low utterance-to-utterance latency and smooth turn-taking.
## Layers
The Conversational Video Interface (CVI) is built on a modular layer system, where each layer handles a specific part of the interaction. Together, they capture input, process it, and generate a real-time, human-like response.
Here’s how the layers work together:
Uses **Raven** to analyze user expressions, gaze, background, and screen content. This visual context helps the replica understand and respond more naturally.
[Configure the Perception layer](/sections/conversational-video-interface/persona/perception)
Controls the natural dynamics of conversation, including turn-taking and interruptibility. Uses **Sparrow** for intelligent turn detection, enabling the replica to decide when to speak and when to listen.
[Configure the Conversational Flow layer](/sections/conversational-video-interface/persona/conversational-flow)
This layer transcribes user speech in real time with lexical and semantic awareness.
[Configure the Speech Recognition (STT) layer](/sections/conversational-video-interface/persona/stt)
Processes the user's transcribed speech and visual input using a low-latency LLM. Tavus provides ultra-low latency optimized LLMs or lets you integrate your own.
[Configure the Large Language Model (LLM) layer](/sections/conversational-video-interface/persona/llm)
Converts the LLM response into speech using the supported TTS Engines (Cartesia **(Default)**, ElevenLabs, Azure).
[Configure the Text-to-Speech (TTS) layer](/sections/conversational-video-interface/persona/tts)
Delivers a high-quality, synchronized digital human using Tavus's real-time avatar engine (**Phoenix**).
[Replica overview](/sections/replica/overview)
Most layers are configurable via the [Persona](/sections/conversational-video-interface/persona/overview).
## Getting Started
You can quickly create a conversation by using the Developer Portal or following the steps in the [API Conversation Quickstart](/sections/conversational-video-interface/quickstart/cvi-quickstart) guide.
If you use **Cursor**, **Copilot**, or another **AI coding agent**, use the copy-paste checklist on **[CVI App: AI Prompt](/sections/conversational-video-interface/quickstart/ai-prompt-cvi-quickstart)**.
For web apps, start with [CVI App Quickstart](/sections/conversational-video-interface/quickstart/build-first-app), then choose an embed path in [Embed CVI](/sections/integrations/embedding-cvi). React apps that want Tavus-provided UI should use the [`@tavus/cvi-ui` component library](/sections/conversational-video-interface/component-library/overview), including [blocks](/sections/conversational-video-interface/component-library/blocks), [components](/sections/conversational-video-interface/component-library/components), [hooks](/sections/conversational-video-interface/component-library/hooks), and [server helpers](/sections/conversational-video-interface/component-library/server).
Conversational Video Interface (CVI) is a framework for creating real-time multimodal video interactions with AI. It enables an AI agent to see, hear, and respond naturally, mirroring human conversation.
CVI is the world’s fastest interface of its kind. It allows you to map a human face and conversational ability onto your AI agent. With CVI, you can achieve low-latency utterance-to-utterance response: the full round-trip time from when a participant speaks to when the replica replies.
CVI provides a comprehensive solution, with the option to plug in your existing components as required.
## At a glance
Building with an AI coding agent or automation? Use
`https://docs.tavus.io/llms.txt` for the canonical page index,
`https://docs.tavus.io/llms-full.txt` for the full bundled docs export, and
`https://docs.tavus.io/openapi.yaml` for the HTTP API contract.
* **CVI** — Real-time multimodal video: the agent sees, hears, and responds; media runs over **WebRTC** (powered by Daily).
* **Latency** — Utterance-to-utterance round-trip is optimized for real-time use (participant speaks → replica replies).
* **Three pillars** — **[Persona](/sections/conversational-video-interface/persona/overview)** (behavior, knowledge, and CVI layer pipeline); **[Replica](/sections/replica/overview)** (visual digital human, **Phoenix**); **[Conversation](/sections/conversational-video-interface/conversation/overview)** (live session linking persona and replica).
* **Pipeline (in order)** — Perception (**Raven**) → Conversational Flow (**Sparrow**) → Speech recognition (STT) → Large language model (LLM) → Text-to-speech (TTS) → Realtime replica (**Phoenix**). **Raven** is visual perception; **Sparrow** handles turn-taking and interruptibility; **Phoenix** is the real-time visual replica engine.
* **Where to configure** — Most layers are set on the **[Persona](/sections/conversational-video-interface/persona/overview)**.
## Key Concepts
CVI is built around three core concepts that work together to create real-time, humanlike interactions with an AI agent:
The **Persona** defines the agent’s behavior, tone, and knowledge. It also configures the CVI layer and pipeline.
The **Replica** brings the persona to life visually. It renders a photorealistic human-like avatar using **Phoenix**.
A **Conversation** is a real-time video session that connects the persona and replica through a WebRTC connection.
## Key Features
CVI uses facial cues, body language, and real-time turn-taking to enable natural, human-like conversations.
Customize the Perception, STT, LLM and TTS layers to control identity, behavior, and responses.
Choose from over 100+ hyper-realistic stock replicas or customize your own with human-like voice and expression.
Hold natural conversations in 42+ languages using the supported TTS engines.
Experience real-time interactions with low utterance-to-utterance latency and smooth turn-taking.
## Layers
The Conversational Video Interface (CVI) is built on a modular layer system, where each layer handles a specific part of the interaction. Together, they capture input, process it, and generate a real-time, human-like response.
Here’s how the layers work together:
Uses **Raven** to analyze user expressions, gaze, background, and screen content. This visual context helps the replica understand and respond more naturally.
[Configure the Perception layer](/sections/conversational-video-interface/persona/perception)
Controls the natural dynamics of conversation, including turn-taking and interruptibility. Uses **Sparrow** for intelligent turn detection, enabling the replica to decide when to speak and when to listen.
[Configure the Conversational Flow layer](/sections/conversational-video-interface/persona/conversational-flow)
This layer transcribes user speech in real time with lexical and semantic awareness.
[Configure the Speech Recognition (STT) layer](/sections/conversational-video-interface/persona/stt)
Processes the user's transcribed speech and visual input using a low-latency LLM. Tavus provides ultra-low latency optimized LLMs or lets you integrate your own.
[Configure the Large Language Model (LLM) layer](/sections/conversational-video-interface/persona/llm)
Converts the LLM response into speech using the supported TTS Engines (Cartesia **(Default)**, ElevenLabs, Azure).
[Configure the Text-to-Speech (TTS) layer](/sections/conversational-video-interface/persona/tts)
Delivers a high-quality, synchronized digital human using Tavus's real-time avatar engine (**Phoenix**).
[Replica overview](/sections/replica/overview)
Most layers are configurable via the [Persona](/sections/conversational-video-interface/persona/overview).
## Getting Started
You can quickly create a conversation by using the Developer Portal or following the steps in the [API Conversation Quickstart](/sections/conversational-video-interface/quickstart/cvi-quickstart) guide.
If you use **Cursor**, **Copilot**, or another **AI coding agent**, use the copy-paste checklist on **[CVI App: AI Prompt](/sections/conversational-video-interface/quickstart/ai-prompt-cvi-quickstart)**.
For web apps, start with [CVI App Quickstart](/sections/conversational-video-interface/quickstart/build-first-app), then choose an embed path in [Embed CVI](/sections/integrations/embedding-cvi). React apps that want Tavus-provided UI should use the [`@tavus/cvi-ui` component library](/sections/conversational-video-interface/component-library/overview), including [blocks](/sections/conversational-video-interface/component-library/blocks), [components](/sections/conversational-video-interface/component-library/components), [hooks](/sections/conversational-video-interface/component-library/hooks), and [server helpers](/sections/conversational-video-interface/component-library/server).